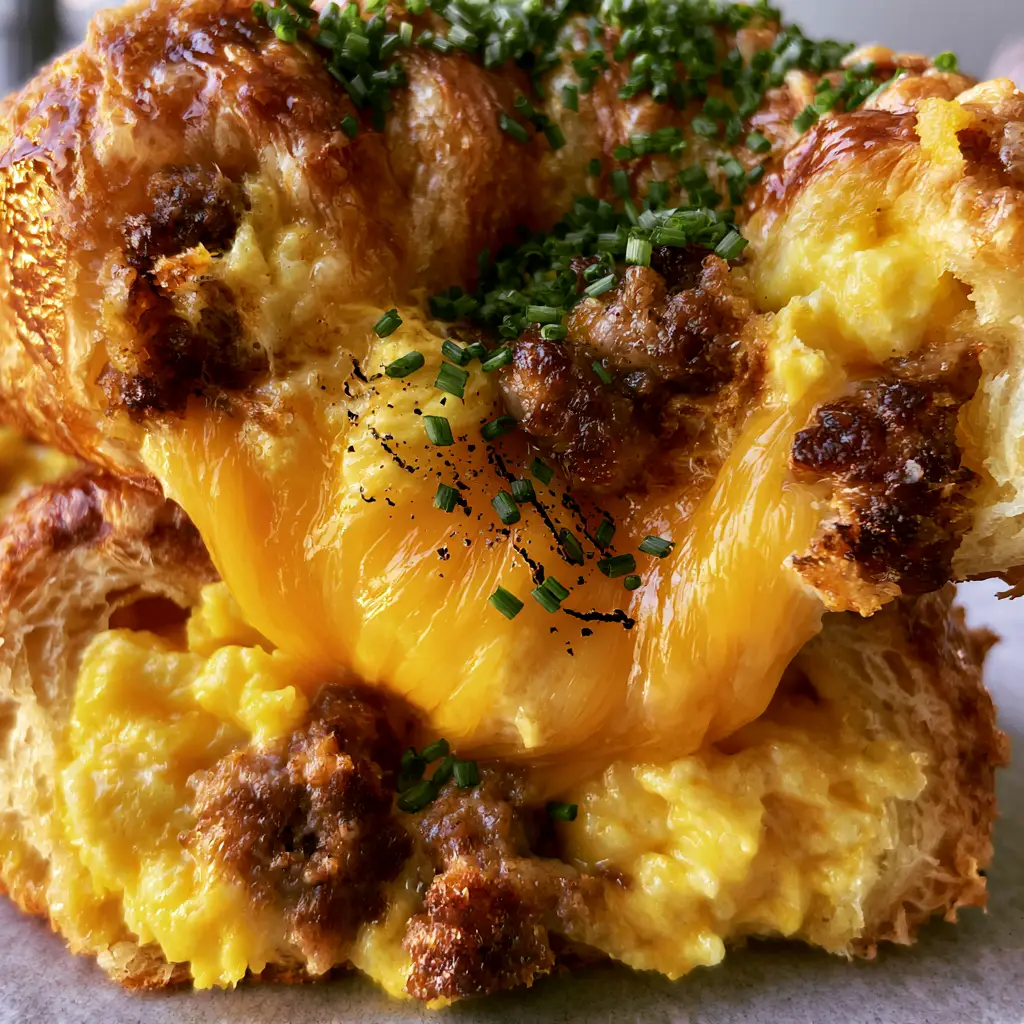
There is nothing quite like the sight of a golden, buttery pastry being pulled apart to reveal a steam-filled center of gooey cheese and savory protein. These Breakfast roll-ups are designed to be the ultimate handheld morning meal, combining the convenience of a grab-and-go snack with the gourmet textures of a sit-down brunch. Inspired by the rustic charm of a home-cooked kitchen, each bite offers a symphony of flaky layers and rich, savory fillings.
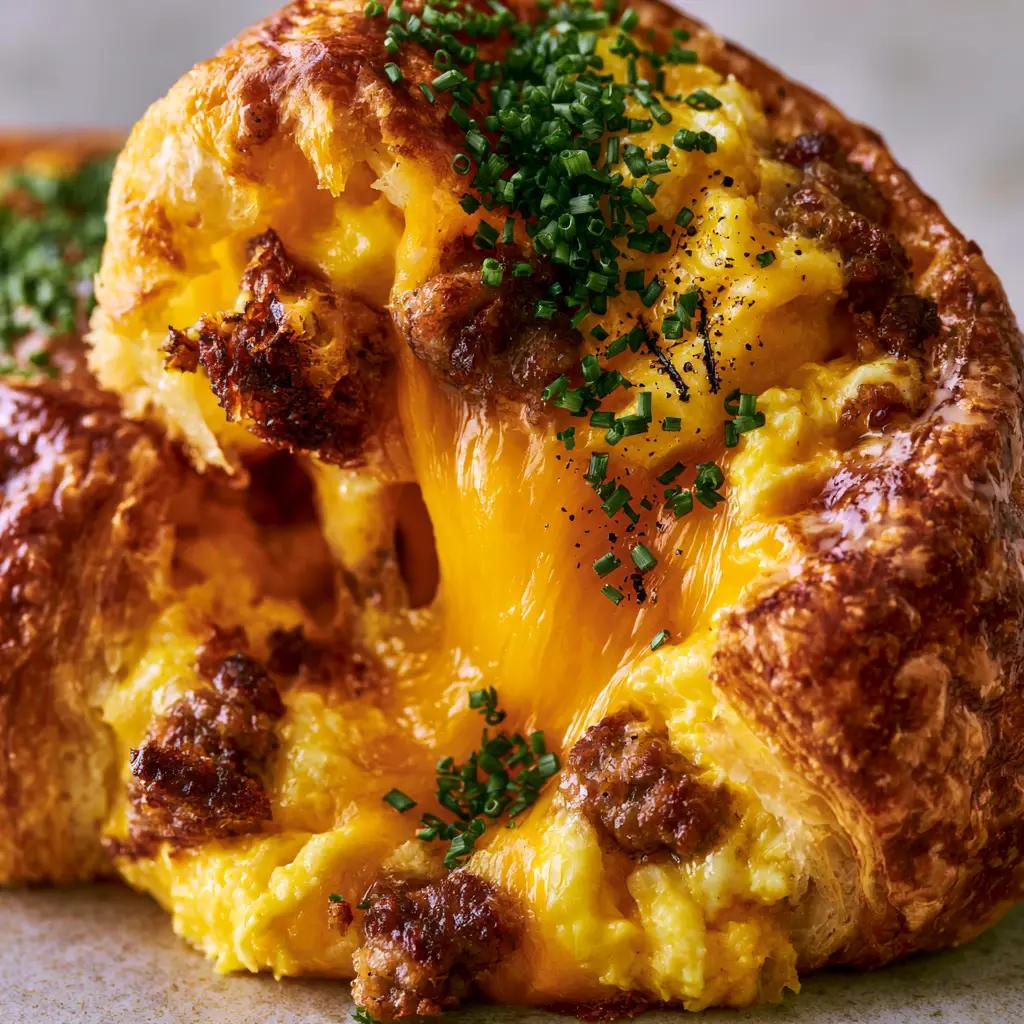
In this guide, we are diving deep into the culinary mechanics of the perfect breakfast pastry. We aren’t just rolling dough; we are engineering a texture-rich experience that features vibrant yellow soft-scrambled eggs and perfectly browned pork sausage. Whether you are prepping for a busy weekday or hosting a cozy family gathering, these Breakfast roll-ups provide that “wow factor” through an extreme cheese pull and a glistening, egg-washed finish.
Every element of this recipe has been calibrated to match the visual perfection of a professional kitchen. From the sharp bite of fresh chives to the aromatic crack of black pepper, these roll-ups are as beautiful as they are delicious. Let’s explore how to achieve that signature golden-brown crust and the science behind the fluffiest egg filling possible.
Why These Handheld Breakfast Pastries Are a Morning Game-Changer
- The Ultimate Cheese Pull: By using high-fat sharp cheddar and specific layering techniques, we achieve a massive, gooey interior that stretches with every bite.
- Textural Contrast: We pair the shatteringly flaky layers of refrigerated crescent dough with the velvety softness of low-and-slow scrambled eggs.
- Protein-Packed Portability: Well-browned pork sausage crumbles provide a savory, salty foundation that keeps you full until lunch.
- Visual Sophistication: The glistening egg-wash finish and vibrant green chive garnish make these look like they came from a high-end bakery.
The Anatomy of a Perfect Breakfast Roll-Up: Essential Ingredients
Refrigerated Crescent Dough (1 can / 225g): This serves as our buttery, laminated base. Using pre-made dough ensures consistent flakiness while significantly reducing prep time for busy mornings.
Ground Pork Sausage (1/2 lb / 225g): We look for a high-quality breakfast sausage with notes of sage and black pepper. Browning this until deeply caramelized is the key to a savory depth of flavor.
Large Eggs (4 total): These are the “vibrant yellow” heart of the roll-up. We whisk them thoroughly to incorporate air, ensuring they remain soft and pillow-like inside the pastry.
Sharp Cheddar Cheese (1 cup / 115g, shredded): Sharp cheddar provides the necessary fat content for a dramatic melt. Grating your own cheese from a block ensures a smoother melt compared to pre-shredded varieties.
Fresh Chives (2 tbsp / 6g, finely chopped): These provide a mild onion-like brightness and a pop of green color that cuts through the richness of the sausage and cheese.
Whole Milk or Heavy Cream (1 tbsp / 15ml): Added to the eggs, this prevents the proteins from bonding too tightly, maintaining that soft-scrambled texture during the baking process.
Unsalted Butter (1 tbsp / 14g): Used for scrambling the eggs to add a rich, nutty undertone that complements the crescent dough.
Egg Wash (1 egg + 1 tsp water): This is the secret to the glistening, professional finish. It promotes even browning and creates a “glue” for our garnishes.
Cracked Black Pepper and Kosher Salt: Essential for seasoning. The cracked pepper adds a localized heat that balances the creamy eggs.
The Gear: Tools for Culinary Precision
To achieve the “extreme close-up” quality seen in professional food photography, you need the right tools. A heavy-bottomed non-stick skillet is non-negotiable for the soft scramble to prevent browning the eggs. A high-quality baking sheet lined with parchment paper ensures the bottom of your Breakfast roll-ups doesn’t burn before the top is golden.
A pastry brush is essential for applying the egg wash evenly across the “visible layers” of the dough. Lastly, use a sharp chef’s knife or a pair of kitchen shears to achieve those “finely minced” chives that sit perfectly atop the finished pastry.
Developing the Flavor: Mastering the Sausage and Eggs
The Art of the Browned Sausage Crumble
Heat your skillet over medium-high heat. Add the pork sausage, breaking it into small, uniform crumbles with a wooden spoon. You are looking for a deep, mahogany brown color—this is the Maillard reaction in action, providing the “savory” profile mentioned in our visual blueprint. Once browned, drain the fat thoroughly on a paper towel to ensure your dough doesn’t become soggy.
The Science of the Soft Scramble
Wipe the skillet and reduce heat to low. Whisk your eggs with milk and a pinch of salt until no streaks remain. Melt the butter until foaming, then add the eggs. Use a silicone spatula to move the eggs constantly. Remove them from the heat while they still look slightly “wet.” They will continue to cook inside the oven, and this technique ensures they remain “vibrant yellow” and soft rather than rubbery.
Assembly: How to Roll for Maximum Flakiness
Unroll your crescent dough and separate it into triangles. Place a generous tablespoon of the soft scrambled eggs on the wide end of each triangle, followed by a sprinkle of sausage and a handful of shredded cheddar. If you love variety in your morning routine, you might also enjoy our breakfast flatbread for a similar flavor profile in a different format.
Carefully roll the dough toward the point, tucking in any stray bits of egg or sausage. Place them on your prepared baking sheet with the point side down to prevent them from unrolling. This assembly method creates the “visible layers” that catch the light and create that satisfying crunch. For those cooking for a crowd, this process is a staple in many team breakfast recipes.
Baking to Golden Perfection
Preheat your oven to 375°F (190°C). Lightly beat your remaining egg with a teaspoon of water and brush it liberally over the tops of each roll. This creates that “glistening egg-wash finish.” Sprinkle the finely chopped chives and a few cracks of black pepper directly onto the wet egg wash so they adhere during the bake.
Bake for 12-15 minutes. You are looking for a specific sensory cue: the pastry should be a “golden-brown” and the cheese should be bubbling out of the ends. The aroma of buttery pastry and toasted sausage will fill your kitchen, signaling they are ready to serve.
Expert Tips for the Ultimate Breakfast roll-ups
- Keep the Dough Cold: Only take the crescent dough out of the fridge when you are ready to roll. Warm dough loses its structure and won’t puff as effectively.
- Drain the Sausage: Any excess grease will soak into the dough, preventing it from becoming flaky and crisp.
- Don’t Overstuff: While a “packed interior” is the goal, leave enough room to seal the edges so the cheese pull stays inside until the first bite.
- Use a Block of Cheese: Pre-shredded cheese is coated in potato starch to prevent clumping, which can hinder that “massive, gooey cheese pull” we are looking for.
Storage and Reheating for Busy Mornings
If you have leftovers, these Breakfast roll-ups store beautifully. Place them in an airtight container in the refrigerator for up to 3 days. To maintain the “shatteringly flaky” texture, avoid the microwave. Instead, reheat them in a toaster oven or air fryer at 350°F (175°C) for 5 minutes until the cheese is remelted.
For long-term storage, you can freeze these individually on a tray before transferring them to a freezer bag. This is a great addition to your collection of snack recipes, provided you substitute with a gluten-free pastry alternative.
What to Serve With Your Savory Roll-Ups
To balance the richness of the sausage and cheese, pair these roll-ups with a bright, acidic side. A fresh fruit salad or a glass of our blackberry coconut pink drink provides a refreshing contrast. If you’re hosting a full brunch spread, consider serving these alongside greek yogurt waffles for a mix of sweet and savory options.
Frequently Asked Questions
Yes. Bake them fully, let them cool, and freeze. Reheat in an air fryer or oven at 350°F (175°C) to restore the crispiness of the pastry.
Yes! You can assemble them the night before and keep them covered in the fridge. Brush with egg wash and bake fresh in the morning for the best texture.
Absolutely. Puff pastry will result in a much taller, more shatteringly flaky roll-up, though it may require a slightly longer baking time.
The key is to thoroughly drain the browned sausage and ensure your scrambled eggs aren’t too watery. Using parchment paper on the baking sheet also helps the bottom crisp up.
High-moisture cheeses like Sharp Cheddar or Mozzarella work best. For the best result, grate the cheese yourself from a block to avoid anti-clumping starches.
The Ultimate Breakfast roll-ups Recipe
Breakfast roll-ups with Sausage, Egg, and Melty Cheddar
Ingredients
Equipment
Method
- In a skillet over medium-high heat, brown the pork sausage while breaking it into small crumbles. Cook until no pink remains and a deep golden crust forms. Drain on paper towels.
- Whisk 3 eggs with milk and a pinch of salt. In a clean skillet, melt butter over low heat. Add eggs and stir constantly until just set and vibrant yellow. Remove from heat immediately.
- Unroll crescent dough triangles. Place eggs, sausage, and cheese on the wide end. Roll toward the point and place on a parchment-lined tray.
- Whisk the remaining egg with water. Brush onto the rolls until glistening. Top with chopped chives and cracked black pepper.
- Bake at 375°F (190°C) for 12-15 minutes until the pastry is golden-brown and flaky with visible layers.
Notes
Slightly undercook the eggs as they will finish cooking in the oven.

Final Thoughts on This Savory Morning Treat
Mastering the Breakfast roll-ups is about balancing simple ingredients with precise technique. The contrast of the well-browned sausage against the soft, vibrant eggs, all encased in a buttery, glistening crust, creates a breakfast experience that is truly second to none. It’s an authentic, messy, and delicious way to start any day.
If you enjoyed this recipe, please leave a comment below and let us know how your cheese pull turned out! Don’t forget to share your creations and follow us on Pinterest for more culinary inspiration and visual recipe guides.